As I’m generally working with things sitting on top of the hypervisor and/or inside of VMs, I hadn’t made upgrading vSphere itself a huge priority in my lab environment. With the release of vSphere 6.7 Update 1 I decided to spend some time getting both vCenter and ESXi on the latest version.
My lab environment is fairly simple, a single vCenter Server Appliance (VCSA) with embedded PSC. Given the simplicity of the environment and lack of any critical workloads, I probably would have been successful by downloading the bits, honoring the vCenter first rule, and then haphazardly approaching the remaining tasks. However, I decided to take a slightly more structured approach to this. Nigel Hickey’s recent blog post series on the VMware vSphere Blog (link goes to part 6, which both leads and closes with links to the other posts) provided a great structure to follow. This series also addressed the unique aspects of this particular upgrade, including pulling the vSphere Update Manager (VUM) into the appliance. With this approach I found I put effort into immediately performing some of later upgrade tasks, that I might have otherwise indefinitely postponed, such as upgrading distributed virtual switches and replacing several of my VMFS5 datastores with VMFS6 equivalents.
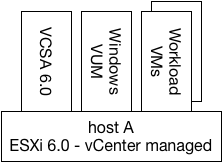
There was one element of my upgrade that I wanted spend some time documenting. For context, my pre-upgrade environment was entirely vSphere 6.0 based. This included a 6.0 VCSA, a Windows Server for VUM, and a mix of Linux and Windows workload VMs.

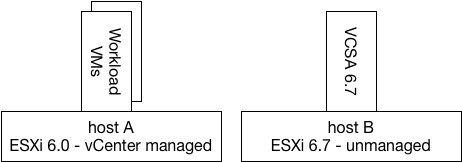
As part of this upgrade process I wanted to introduce an already running, but unmanaged, ESXi 6.7 host into this environment. The simple path here would be to upgrade first and then introduce the new host. However, in addition to introducing this new host, I wanted to place the new vCenter server appliance on it. Following upgrade of the vCenter server, but prior to any other upgrade steps, this would result in a newly deployed 6.7 VCSA running on a previously unseen ESXi 6.7 host, the workload VMs remaining on the existing host, and no need for additional VMs to support update manager.

This turns out to be relatively simple to do during the upgrade process. As noted in Nigel’s blog series, the vCenter upgrade is a two-stage process. Stage 1 deploys a new vCenter Server Appliance (VCSA), and Stage 2 copies configuration data from the existing source appliance to the newly deployed appliance. While stage 1 gathers information about the existing environment, the selection of a deployment target in Step 4 (see Step 4a in Part 2 of the vSphere Upgrade Series posts) is selected independently of any other environment information already gathered.
Once the new vCenter server was up and running (the end of Part 2), I added the new ESXi 6.7 host into the vCenter inventory. Following some standard configuration items for a new host (adding the distributed virtual switch, mounting NFS storage, etc), I continued with the tasks in the series.
While there were no barriers involved in the approach I used, it is probably not the first option that comes to mind. This is especially true for those who have prior experience with in-place Windows vCenter server upgrades. In addition to being used in smaller lab environments, I could see a similar approach being used during an environment expansion that included a need to move the vCenter server to a different environment.
A couple of other upgrade related notes that may be of interest:
-
- I wasn’t entirely happy with the sizing options out of the box for my new vCenter 6.7 appliance. There are several resources about resizing the appliance, but most seem to point to William Lam’s Dynamic Memory Resizing for vCenter server 6.0 post. I was able to use this to reclaim CPU and memory resources from the appliance following deployment without issue.
- Given the self-signed certificates currently in use, I did need to validate the new self-signed certificate within the Horizon admin interface. Other environments may require a similar process with other services.